The instructions below will create a custom profile for TIFF Image Printer, mark it as shared and configure TIFF Image Printer to use this profile. If you want to limit your users to the settings in this profile, you also need to lock this profile to the printer. We then create the export settings file, and, using that file, install our custom TIFF Image Printer printer with our settings on the target machine.
➢Install the Custom Printer During Setup
Create the Export File - Step by Step Instructions
1.Install TIFF Image Printer on a single computer. You do not have to license the software at this point.
2.Follow the steps in Create a New Profile Settings File to create as many custom profiles as you need. This can be a single profile, or more than one if you need to be able to switch between different types of output. A common example is needing to create both color and black and white images.
3.To use your new profiles to customize your printer settings, you must mark them as Shared. This is critical for the profiles to be shared to all users when you install the custom printer settings.
In the tiles view of the Profile Manager, locate the tiles for your new profiles. Mark them as shared using the share tile icon in the bar at the bottom.

4.This action will convert the personal profile into a shared profile. It will change from a tile with a colored border to one with a gray border.

5.Close the Profile Manager at this point, we are done with it. The next step is to set the profile for the TIFF Image Printer 12 printer to one of profiles you just created. To do this, go to the TIFF Image Printer Dashboard, then select "Manage Printers" to open Printer Management.
6.Select the TIFF Image Printer 12 printer and use the Profile drop box to select your one of your new shared profiles. A shared profile is designated with the user and globe icon  in the drop down list.

7.Once a shared profile is selected, you now have the option of locking this profile to the printer. If you need to change between multiple profiles, do not lock the profile. If you need to limit your users to only the settings in a single profile, click the lock icon to lock the profile to the printer. When locked to a shared profile the icon will change to a closed lock and the Profile combo will be disabled.

8.After changing the profile, and locking it if you need to, click the Save icon to save the changes to the TIFF Image Printer 12 printer.

9.Next, the Backup and Restore All Settings feature is used to create the export file that contains the customized TIFF Image Printer 12 printer, and your shared or locked profiles you will use when pushing or installing the printer software.
10.Click the gear icon from the top right hand corner of the Dashboard window, and select "Export Printer Settings".

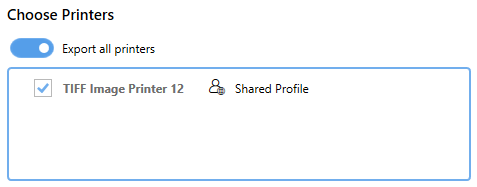
11.Under Choose Printers disable "Export all printers" and select the TIFF Image Printer 12 printer with the custom shared profile. If you have not created any other printers, you will only see the TIFF Image Printer 12 in the list.
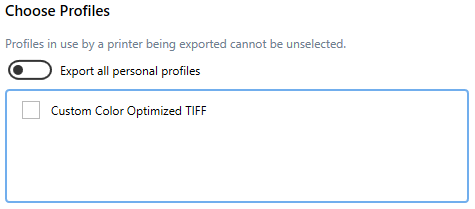
12.Under Choose Profiles disable "Export all personal profiles" if you created any personal profiles. For custom printers we need to use shared profiles to set any custom printer settings, not personal profiles. Any profiles that are in use by a printer being exported are automatically selected and cannot be unselected. If you have a personal profile set on the TIFF Image Printer 12 printer, go back and make the profile shared before continuing. If you have not created any personal profiles, you will see a message "No personal profiles found to export." here instead of a list of profiles.
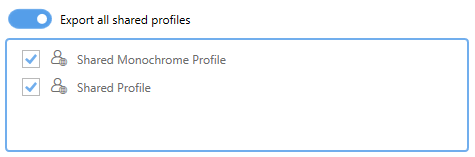
13.Leave the "Export all share profiles" toggled when the list contains only the custom profiles you want to have available to your users. If you have others, disable "Export all shared profiles" and select only the shared profiles you need to export. Any shared profile in use by a printer being exported is automatically selected and cannot be unselected. If you see the message "No shared profiles found to export." here instead of a list of profiles, go back to steps 2 and 3 above to create your shared profiles.
14.Select Start Export at the bottom, and save the custom settings file, PrinterSettings.pntifexport. This is the file we need to pass during installation to customize the printer settings during setup.
Install the Custom Printer During Setup
To install the customized TIFF Image Printer 12 printer on another computer, the setup program and the export file created above need to be accessible from that computer. If you use push software, the export settings file needs to be in a location that is accessible when the push software runs the setup. Push software that uses the System account needs to use an export file with only shared or locked profiles as created above.
Replace ### used below with the version number of your TIFF Image Printer setup program.
Common Installation Scenarios
Install TIFF Image Printer with Only Your Custom Profiles, Hide Dashboard and Notifications (Pre-Authorized Open only)
pntifsubsetup_12.0.###.exe /k=password /S SHOWUI=FALSE NOTIFYUI=FALSE DRIVERONLY=TRUE CONFIGPRINTER="C:\PEERNET\PrinterSettings.pntifexport"
Install TIFF Image Printer with Only Your Custom Profiles, Show Dashboard and Hide Notifications (Subscription only)
pntifsubsetup_12.0.###.exe /S NOTIFYUI=FALSE DRIVERONLY=TRUE CONFIGPRINTER="C:\PEERNET\PrinterSettings.pntifexport"
Install TIFF Image Printer with Default and Custom Profiles, Do Not Install UI or Notifications (Pre-Authorized Open only)
pntifsubsetup_12.0.###.exe /k=password /S NOTIFYUI=FALSE NODASH=TRUE NOMGR=TRUE NOEDIT=TRUE NOPMGT=TRUE CONFIGPRINTER="C:\PEERNET\PrinterSettings.pntifexport"
Install TIFF Image Printer with UI, Add Custom Profiles
pntifsubsetup_12.0.###.exe /S CONFIGPRINTER="C:\PEERNET\PrinterSettings.pntifexport"
Install Command Line Arguments
/S |
Silent install - With the silent install command line parameter set, the entire installation will execute silently, without a user interface, or any user intervention. When any input is required on dialog boxes, the default values of dialog controls will be used. |
/k=password |
Password protected installs - This parameter is required for password protected Pre-Authorized Open installs to pass the password into the install. This parameter must be a lower case k. Quotes around the password are not needed but are accepted. |
SHOWUI=FALSE |
Hides the Desktop Icons and Start Menu Shortcuts - This parameter is valid for Pre-Authorized Open licenses. Do not use this parameter if you need to license the software on the computer, as that can only be done through the dashboard. This hides the printer dashboard desktop and start menu icons that are normally created as part of the install. Used along with CONFIGPRINTER when installing a customized printer. |
NOTIFYUI=FALSE |
Hide the Update and License Notifications - Only valid with Subscription licenses and on Windows 10 and higher, Windows Server 2016 and higher. This hides the popup, or toast, notifications, that TIFF Image Printer displays when the subscription is close to its renew date, if it has expired, or when a newer version of the product is available to download. Passing in FALSE for the NOTIFYUI option will install the product but not add the notification components. |
DRIVERONLY=TRUE |
Do Not Install the TIFF Image Printer Printer - Only valid with Subscription licenses. This option can only be used along with the CONFIGPRINTER option to install a custom version of TIFF Image Printer with custom settings. |
CONFIGPRINTER="path to PrinterSettings.pntifexport" |
Customize Printer Name and Settings - This is the full path to an exported settings file that contains the printer and profiles for your custom printer setup, in quotes. |
Hiding the Printer User Interface
In cases when you want to customize TIFF Image Printer with your own settings, you often do not want your users to be able to change or edit those settings. For this reason, there are command line options you can pass to the setup program to control what parts of the user interface, if any, are installed. Using these parameters you can hide the printer dashboard and license and upgrade notifications, or keep the dashboard and disable the only the tools you don't want the users to use.
NODASH=TRUE |
Do not install the Dashboard. Excludes the dashboard components, desktop icons and menu shortcuts from the install. This parameter is valid for Pre-Authorized Open licenses. Do not use this parameter if you need to license the software on the computer, as that can only be done through the dashboard. |
NOEDIT=TRUE |
When installing a customized printer setup with a locked profile, you may not want the end users to be able to edit the locked profiles. Passing in TRUE for the NOEDIT option will exclude the Profile Editor from the install of the product. The Edit Profile/Manage Profiles button on the Printing Preferences dialog will be hidden. This parameter is valid for Subscription licenses. |
NOMGR=TRUE |
Passing TRUE for the NOMGR option when installing will exclude the Profile Manager from the install of the product. If the Dashboard is still included, clicking the Edit & Create Profiles tile will show a view stating the feature is disabled. This parameter is valid for Subscription licenses. |
NOPMGT=TRUE |
When installing a customized printer setup you may want to hide the Printer Management features in the dashboard. Passing in TRUE for the NOPMGT option will show a view stating the feature is disabled when the Mange Printers tile is selected on the Dashboard. This parameter is valid for Subscription licenses. |
For a full description of the install command line arguments see Install Command Line Syntax.